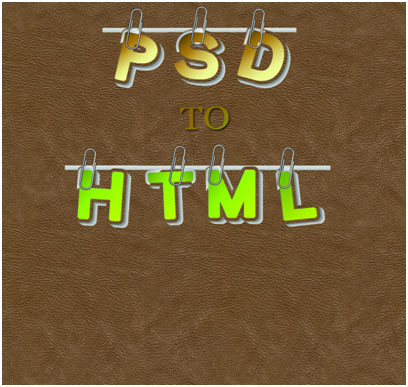
PSD to HTML Conversion: A Detailed Tutorial on Mouse Hovering Effect
Are you a new web developer? Are you trying to learn how to apply a mouse hovering effect on a web page elements? If the answer to both the questions asked is ‘Yes.’ Then go ahead and read this detailed tutorial which will guide you through the Conversion process of HTML5 and CSS from Photoshop file highlighting the mouse hovering effect process.
Table of Contents
- The HTML or index.html File
- The Initial Code
- The Core Section of the Code
- The Style.CSS File
- The Starting
- The Finishing Touch
Mouse hovering effect is one of the most used elements of a CSS. However, for a beginner in web development it looks a bit complicated task to attain. But believe us it isn’t, in fact, it’s a very simple task which you can accomplish in just a matter of a few minutes, and we will show you the correct way to do it in a detailed tutorial.
But before we move ahead with the coding part, let’s have a look at our PSD file given below.

“Download this PSD to HTML5 Conversion Tutorial Files Here“
Now we will be applying the mouse hover effect on each and every alphabet present in the given PSD except the word ‘To.’ To make you understand easily and better we will be explaining you each and every code individually. However, we assume that you at least have a basic knowledge of HTML5 and CSS3. This will eventually make it easier for you to understand the complicated looking set of codes. But if you think you still need to know what Doctype, HTML, Head, Meta, Title, Body, etc. tags are, then we suggest you to go through this detailed tutorial on PSD to HTML5 conversion where we have described the HTML codes since the very beginning.
So are you ready for the game now? Yeah we know you are, so let’s play it!
Let’s begin with the HTML first.
The HTML or index.html File
|
1 2 3 4 5 6 7 8 9 10 11 12 13 14 15 16 17 18 19 20 21 22 23 24 25 26 27 28 |
<!doctype html> <html> <head> <meta charset="utf-8"> <title>My_project</title> <link href="common/css/style.css" type="text/css" rel="stylesheet" /> </head> <body> <div class="wrapper"> <section id="body_container"> <ul class="top_link"> <li><a href="http://www.xhtmljunction.com" class="p_img"></a></li> <li><a href="https://www.xhtmljunction.com/photoshop-to-html.html" class="s_img"></a></li> <li><a href="https://www.xhtmljunction.com/psd-to-wp.html" class="d_img"></a></li> </ul> <span class="middle_img"><img src="common/images/to_img.png" alt="" /></span> <ul class="bottom_link"> <li><a href="https://www.xhtmljunction.com/psd-to-joomla-theme.html" class="h_img"></a></li> <li><a href="https://www.xhtmljunction.com/psd-to-magento.html" class="t_img"></a></li> <li><a href="https://www.xhtmljunction.com/psd-to-drupal.html" class="m_img"></a></li> <li><a href="https://www.xhtmljunction.com/psd-to-oscommerce.html" class="l_img"></a></li> </ul> </section> </div> </body> </html> |
The Initial Code
|
1 2 3 4 5 6 7 8 |
<!doctype html> <html> <head> <meta charset="utf-8"> <title>My_project</title> <link href="common/css/style.css" type="text/css" rel="stylesheet" /> </head> <body> |
This is just a very basic HTML5, where you define your doctype, open the html tag to start working on the HTML document, then comes the head tag where you place all your Meta tags, Title tag and link your CSS and JavaScript files using the link tags, and close the head tag. Then starts the body tag, where our core code comes in. Ah! Does it still look tough to understand? If you wish to refresh your memory on this, you can visit the W3Schools website.
The Core Section of the Code
|
1 2 3 4 5 6 7 |
<div class="wrapper"> <section id="body_container"> <ul class="top_link"> <li><a href="http://www.xhtmljunction.com" class="p_img"></a></li> <li><a href="https://www.xhtmljunction.com/photoshop-to-html.html" class="s_img"></a></li> <li><a href="https://www.xhtmljunction.com/psd-to-wp.html" class="d_img"></a></li> </ul> |
Here the first noticeable thing is that we have made a div tag and gave it a ‘Wrapper’ class. In the second line we have written a section tag and gave it an id of body_container. Now we need to place our images in a horizontal sequence for which we have used an unordered list. Though this could have also been done via div tags by using the float property, but that’s not a standard practice. So in the third line we have written the unordered list tag and gave it a ‘top_link’ class. After that, we have written the 3 list tags, each comprising of a different hyperlink. Here you might have also noticed that we have mentioned different class in all three list tags, namely; p_img, s_img, and d_img, and at the end we have closed our first unordered list.
|
1 |
<span class="middle_img"><img src="common/images/to_img.png" alt="" /></span> |
In the PSD you might have noticed a word “TO,” neither we would be linking it to any site and nor we will be using any mouse hover effect on it, so we have used the span tag giving it a ‘middle_img’ class, and called the image using the img tag. Now again we have to make an unordered list to make the lower section of the PSD.
|
1 2 3 4 5 6 |
<ul class="bottom_link"> <li><a href="https://www.xhtmljunction.com/psd-to-joomla-theme.html" class="h_img"></a></li> <li><a href="https://www.xhtmljunction.com/psd-to-magento.html" class="t_img"></a></li> <li><a href="https://www.xhtmljunction.com/psd-to-drupal.html" class="m_img"></a></li> <li><a href="https://www.xhtmljunction.com/psd-to-oscommerce.html" class="l_img"></a></li> </ul> |
So, like we told you above, we have made another unordered list comprising of four different images inside four different list tags having a unique class namely; h_img, t_img, m_img, l_img. Additionally, we have also given the new unordered list a specific class i.e., bottom_link. Now as both of our unordered lists are complete, we should close all the open tags now.
|
1 2 3 4 |
</section> </div> </body> </html> |
As we have made both of our required lists, we have closed all the open tags namely; section, div, body and html. And we can now move on to CSS to stylize our page, links and apply the mouse hover effect.
The Style.CSS File
|
1 2 3 4 5 6 7 8 9 10 11 12 13 14 15 16 17 18 19 20 21 |
.wrapper { margin:0 auto; width:790px; } #body_container{ float:left; width:100%; background:url(../images/body_bg.jpg) repeat 0 0; padding:5px 0; } #body_container .top_link { float:left; width:auto; list-style:none; padding:0 105px; } #body_container .top_link li { float:left; } .top_link li .p_img { float:left; width:195px; height:250px; background:url(../images/p_img.png) no-repeat 0 0; } .top_link li .p_img:hover { background:url(../images/p_img.png) no-repeat 0 -250px; } .top_link li .s_img { float:left; width:187px; height:250px; background:url(../images/s_img.png) no-repeat 0 0; margin-top:-7px; } .top_link li .s_img:hover { background:url(../images/s_img.png) no-repeat 0 -250px; } .top_link li .d_img { float:left; width:196px; height:250px; background:url(../images/d_img.png) no-repeat 0 0; } .top_link li .d_img:hover { background:url(../images/d_img.png) no-repeat 0 -250px; } .middle_img { float:left; width:100%; text-align:center; padding:5px 0; } .bottom_link { float:left; width:auto; list-style:none } .bottom_link li { float:left; } .bottom_link li .h_img { float:left; width:218px; height:250px; background:url(../images/h_img.png) no-repeat 0 0; } .bottom_link li .h_img:hover { background:url(../images/h_img.png) no-repeat 0 -250px; } .bottom_link li .t_img { float:left; width:176px; height:250px; background:url(../images/t_img.png) no-repeat 0 0; margin-top:-8px; } .bottom_link li .t_img:hover { background:url(../images/t_img.png) no-repeat 0 -250px; } .bottom_link li .m_img { float:left; width:213px; height:250px; background:url(../images/m_img.png) no-repeat 0 0; margin-top:-12px; } .bottom_link li .m_img:hover { background:url(../images/m_img.png) no-repeat 0 -250px; } .bottom_link li .l_img { float:left; width:182px; height:250px; background:url(../images/l_img.png) no-repeat 0 0; margin-top:-4px; } .bottom_link li .l_img:hover {background:url(../images/l_img.png) no-repeat 0 -250px; } |
The Starting
|
1 2 |
.wrapper { margin:0 auto; width:790px; } #body_container{ float:left; width:100%; background:url(../images/body_bg.jpg) repeat 0 0; padding:5px 0; } |
First of all we have set the margin and width of the div having a class of wrapper. Then we have set the width of the section having an id of body_container to 100%, made it float to left, and set the background using an image for which we have mentioned its URL, and gave it a padding of 5px from the top and 0px from all sides to keep it as it is in the PSD file.
The Finishing Touch
|
1 2 3 4 5 6 7 8 9 10 11 12 13 14 15 16 17 18 19 |
#body_container .top_link { float:left; width:auto; list-style:none; padding:0 105px; } #body_container .top_link li { float:left; } .top_link li .p_img { float:left; width:195px; height:250px; background:url(../images/p_img.png) no-repeat 0 0; } .top_link li .p_img:hover { background:url(../images/p_img.png) no-repeat 0 -250px; } .top_link li .s_img { float:left; width:187px; height:250px; background:url(../images/s_img.png) no-repeat 0 0; margin-top:-7px; } .top_link li .s_img:hover { background:url(../images/s_img.png) no-repeat 0 -250px; } .top_link li .d_img { float:left; width:196px; height:250px; background:url(../images/d_img.png) no-repeat 0 0; } .top_link li .d_img:hover { background:url(../images/d_img.png) no-repeat 0 -250px; } .middle_img { float:left; width:100%; text-align:center; padding:5px 0; } .bottom_link { float:left; width:auto; list-style:none } .bottom_link li { float:left; } .bottom_link li .h_img { float:left; width:218px; height:250px; background:url(../images/h_img.png) no-repeat 0 0; } .bottom_link li .h_img:hover { background:url(../images/h_img.png) no-repeat 0 -250px; } .bottom_link li .t_img { float:left; width:176px; height:250px; background:url(../images/t_img.png) no-repeat 0 0; margin-top:-8px; } .bottom_link li .t_img:hover { background:url(../images/t_img.png) no-repeat 0 -250px; } .bottom_link li .m_img { float:left; width:213px; height:250px; background:url(../images/m_img.png) no-repeat 0 0; margin-top:-12px; } .bottom_link li .m_img:hover { background:url(../images/m_img.png) no-repeat 0 -250px; } .bottom_link li .l_img { float:left; width:182px; height:250px; background:url(../images/l_img.png) no-repeat 0 0; margin-top:-4px; } .bottom_link li .l_img:hover {background:url(../images/l_img.png) no-repeat 0 -250px; } |
Now we have to position our main the top_link inside the body container for which we have used the float left property, set the width to auto, and to arrange the list in horizontal axis, we have kept the list-style to none, and gave it a padding of 0px from the top to bottom and 105px from the left to right.
Next, to arrange the positioning of the list from Y axis to X axis we have used the float left property. Then it comes to the images. As you can see we have used all the classes that we described in the HTML while making the list, and given them the float left property so that they all come in exact position, mentioned their height and width in pixels, defined the image URL, and set them to no-repeat. But if you’ll look at the given CSS code, you’ll find that we have also defined the image hover effect. For this we haven’t used any other image but in fact, we have used the CSS Sprite technique where you join two images vertically and make it one. So to bring the hover effect image into play, we have just used ‘:hover’ Pseudo Selector and set the no-repeat property to 0 -250px. And now whenever you will hover your mouse on any of these images, CSS Sprite will come into effect and it will recall the image that is present at the bottom or defined at the given -250px value. For the lower section of the PSD, we have repeated this scenario to get the same result.
Additionally, as we have already called the middle image via HTML, we just needed to bring it into its exact position, for which we have used the float left property, aligned it into center using the text-align property, and added a padding of 5px from the top to bottom, and 0px from the left to right.
Now we are all done, and you can check the result in the browser and see if your HTML matches your PSD or not? If it isn’t look like the same, then check the codes once again and rectify the errors.


